
Harnessing the power of the sun for heating purposes is not only an eco-friendly alternative, but it’s also a cost-effective solution for many homeowners. Among the various solar technologies available, solar thermal air heaters, also known as solar collectors, have gained popularity due to their efficiency and relative simplicity.
These devices capture and concentrate solar energy, converting it into heat that can be used to warm up your home, reducing the need for traditional heating methods and thus saving on energy bills.
In this article, we delve into the world of do-it-yourself solar thermal air heaters. We’ve carefully examined four distinct DIY solar air heater designs, each with its unique set of features and benefits. Our goal is to extract the most advantageous characteristics from each model, amalgamating them into what we believe could constitute the ideal solar air heater.
1. Solar ”PreHeater” Air Heater

This solar “preheater” is attached to the intake of the air exchanger of this R2000 home. Using just $50 worth of materials from the Reuse Store, etc., this simple design provides a significant heat gain via initial testing. With the air exchanger fan on low, this solar air heater provides a 20-degree Celsius increase between the outside temperature and the feed to the air exchanger. When the fan is running on high, the temperature gain is 15 degrees. Air is drawn in via an opening in the bottom right corner and feeds the air exchanger via the connecting box at the bottom left corner of the unit.
Materials consist of 20 feet of 4″ aluminum dryer vent, painted black, a “dual pane thermal” window from the reuse store (see note below on issues with dual pane glass vs tempered glass), wood for box, 1″ ISOTHERM insulation for the lining of the box, and paint. Normally the unit would have been placed over the air intake for the air exchanger but an existing water tap prevented that placement, so the solar heater was placed just above and a box was built to connect the two units. The window was caulked in place and metal striping was added to all four sides.
Further testing is taking place to measure the actual airflow through the heat exchanger, with the solar air heater attached. The intake opening has been reduced from 5 inches, down to the 4-inch width of the black aluminum tube.
As hinted above, a dual-pane thermal window was purchased from the Reuse Store for $8 for this project. After the first full day of full sunlight, the inside pane of glass cracked. The builder would recommend tempered glass for this solar air heater.
April 2012 Update: At the inlet to the “Lifebreath 100” heat recovery ventilator the airflow is 40 cubic feet per minute when the fan is set on low. When the fan is on high, the airflow is 80 cubic feet per minute.
The preheater is consistently increasing the air temperature between the inlet and outlet by 20 degrees Celsius when the fan is on low and 15 degrees Celsius when the fan is on high. These results are only when the preheater is in direct sunlight and the weather is relatively clear. If it’s overcast or the sun is not shining on the preheater (early or late in the day) the increase in air temperature is understandably 0.
2. Solar ”Can” Air Heater
This simple small passive solar heater, made from recycled aluminum drink cans, can be used to heat an insulated garage or small room. A larger heater or several similar heaters can be used to heat larger spaces or to heat smaller spaces to a higher temperature.
The box is built from 2″ x 4″ studs and a sheet of plywood, measured to tightly hold 5 rows of 10 black-painted aluminum drink cans. The inside of the box is sealed using caulk to prevent hot air from escaping. Cold air is drawn in from a hole at the bottom of the box and heated air emerges from the top passing through a pipe into the space to be heated. A Plexiglas sheet is glued to the top of the box to let sunlight in but not let the hot air escape.
This solar space heater works by drawing the air to be heated into the bottom can of a column of cans. The air is then heated inside the cans by the sun’s energy and the hot air within them rises upwards (thanks to convection) to be fed into a pipe which re-enters the building to be heated.
For the air to pass through a column of cans, holes must be drilled into them. There is already a hole at the top of each can out of which the drink is poured. That just leaves holes at the bottom of each can to be drilled. In the bottom can of each column, a 1-inch hole is drilled in the side.
The cans of each column are glued together using caulk or silicon adhesive and painted using black paint to help them absorb the sun’s energy. Barbecue, fireplace, or stove paint is excellent for this as it will not flake off. Make sure it has a matt finish.
The inside of the box must also be painted with the same paint before the columns of cans are glued into position using caulk or silicon adhesive. The outside of the box should be treated with preservatives, varnish, or paint to help it survive the elements for many years.
Ideally, the whole unit will be sealed with a sheet of tempered glass. However, tempered glass (unless you can find and recycle a sheet) is also very expensive. Therefore Plexiglas (plastic) can be used, but it will degrade far more quickly and become opaque blocking out the sunlight.
A hole at the top of the box acts as the hot air outlet and can be connected to the building/room to be heated using an insulated pipe.
Required Improvements to This Design
- “Snake” the cans together so the air travels farther and has more opportunity to take the heat from the aluminum cans.
- Add a fan to both the intake and output sides of the unit, to move more air.
- Insulate the box – bottom, sides, and ends. One-inch rigid foam is easy to work with.
- Keep the input and output pipes short and super-insulated.
3. Heater Grabber Solar Air Heater

This DIY solar air heater “heat grabber” is from a 1977 issue of Mother Earth. My local Home Depot no longer carries the rigid foam insulation board manufactured by Celotex, trade-named “Thermax TF-610. It was impregnated with glass fibers for strength and faced on both sides with heavy aluminum foil. However, they do carry several rigid foam boards that are covered on both sides. With a little imagination, I believe you could still make one of these solar collectors. These plans show just how easy and inexpensive it can be to make your home solar heater.
The plans are just two pictures that you print off at full size. Walking around the building supply store, I did notice the large foam sheets and aluminum soffit sheets. Maybe something similar to this design can be pulled together if you don’t have foam sheets that are covered in aluminum on at least one side.
Page 1 to the left and page 2 to the right.
Click on pages to get a larger version you can print.
This solar air heater attaches to your window and can easily be removed during the hot summer months or the coldest day in winter.
Required Improvements to This Design
- Use a dead air design and only pull the air from the bottom of an aluminum sheet.
- ZigZag the airflow and add a fan to improve airflow through the zigzag maze.
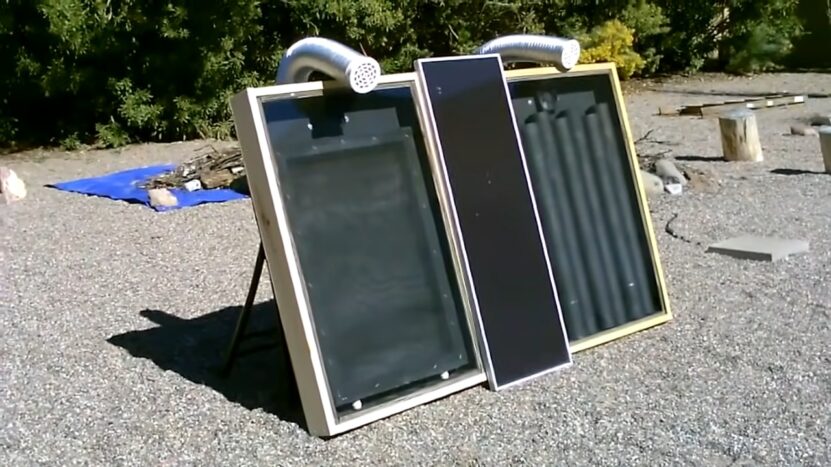
4. The Sponge DIY Solar Air Heater
Our third look at solar air heaters takes us to Sydney where we found a model designed by David and Nicole Jones.
This design for a solar collector comprises a black metal plate that absorbs the solar radiation and converts it into heat and a sealed cavity on top to trap the heat within. The heat is extracted from the back of the plate (via another sealed cavity) and circulated by fans. This is often known as the “dead air space” design.
The air travels through the lower chamber in a zigzag fashion, which allows it time to pick up lots of heat.
Such designs have been around for many decades. The entire collector box is made out of aluminum, which made it easy to work with various pre-made sheets and tubing sizes from the local hardware store.
Another key aspect of the Solar sponge design is the use of very thin (<1mm) polycarbonate sheeting for the front cover. This drastically reduced the cost compared to glass or thicker 3mm polycarb sheeting. Polycarbonate sheeting has similar transmissive properties (around 90%) to the purpose-designed low-iron SunPlus glass but at a fraction of the cost. It is also extremely tough and can withstand hail.
- Internal channels were added to “snake” the air around the box, picking up heat as it goes. With a 1.5m long box, this equates to a total air path of 4.5m, a length long enough to pick up sufficient heat.
- Based on the length of ducting required to get to and from your solar heater, you’ll need to add several fans. David added a total of 4 fans for his solar collector which was mounted on the roof.
For full instructions on how to build this unit, please drop by David and Nicole’s website The Solar Sponge.
Which Solar Air Collector Is Best?
All four DIY solar air heaters have their benefits and drawbacks. Rather than sticking with one of the above designs, we would take a mix of the Solar Sponge and the Heater Gabber from Mother Earth. For our climate, which experiences snow in the winter, I like the window mount and insulated box and also the vertical wall mount of the “solar preheater”. I’d mix with that, the dead air design and the snake air flow from The Sponge. With the snake design, I’ll likely need to add a fan.
Thus we have an EASY window mount that we can take out during the summer months. The box would be insulated and built strong enough to handle a snow load. We use a dead air space on the top of the collector and draw warm air that was snaked through the lower chamber.
Most likely we’d use a low-noise fan to get proper airflow through the solar collector. Of course, attaching it to an existing heat exchanger will provide the fan for moving the heat indoors. The wall mount also keeps the solar heater from being covered in snow and is at a reasonable angle for collecting winter sunlight (60 degrees is perfect for our northern location).
With a growing emphasis on environmentally friendly solutions, DIY solar pool heaters have emerged as an innovative and cost-effective way to raise water temperatures sustainably.